Wednesday, September 29, 2010

His, Her, and Their Coat Closet, Tip 1

Most homes and apartments have a coat closet. And if there's more than one person living in the house, it can get a little those-pair-of-gloves-are-not-worth-looking-in crazy in there.

The next couple of posts will show you some ideas for organizing your coat closet so that there is space for the whole family.


Tip 1: Hanging shoe racks. They are one of my favorite organizational tools. I've put my scarves, gloves, and hats in it. My poor husband has one spot for his winter gear. My kids each have their own spot...down near the floor so they can reach it themselves, sparing me loads of time. And I get the rest. A girl needs her accessories. These shoe racks are also great because they create a natural division for his and her sections of coats.

Stay tuned for more ideas on how to tame the coats!

Sunday, September 26, 2010

How to Organize Gift Wrapping Supplies

Do your gift wrapping supplies look a little like this? Are your rolls of wrapping paper getting torn or dirty because the storage is less than ideal?

Well, the holiday season is approaching fast...be ready for all that gift wrapping by organizing your supplies. You will get less stressed and spend less money since you'll be able to find that spool of ribbon that matches the wrapping paper you have. So, without further ado:

1. Pull it all out. Throw away any odds and ends that are torn, ripped, or otherwise in bad shape. Sort the rest into piles of like items (all the wrapping paper together, the ribbon together, the bags, etc).

2. Consider your storage space. Where does it make the most sense to have your supplies? Where do you have the space for them? Think under the bed, in a closet, under stairs, laundry room, or in a chest. Once you know where you want these items to live, now think about what storage container would fit best. If it's under the bed, look for under the bed storage unit. If it's in a closet, a laundry basket might work well. If it's behind a door, you'll need to get an over the door shoe rack with see through pockets for your items. Take any measurements that you need to.

3. Shop! My favorite. Look online for options. Then go to the store. If you reverse these, you may end up frustrated or with storage that doesn't actually work for you. Some of my favorite container stores are Target, Hobby Lobby, Bed, Bath, and Beyond, Ikea, and The Container Store. Some things to consider while shopping:
  • The time of year you shop. After Christmas is a great time because there are more container options available than the rest of the year, and the sales are great. 
  • Think about clear. Yes, baskets are pretty but they are not practical. You need to be able to see what's in the container at a glance. 
  • Remember that you'll need something tall for the wrapping paper. There are plastic containers that you can buy for that purpose. Or even trash cans can work well for this. Or you can make something. Next time you're at Costco (or Sams or BJ's) ask if they have any tall boxes. If so, grab one and you can store the rolls of wrapping paper in them, cutting the boxes down if you need to.
  • Glass jars can look great for ribbon, bows, etc. if you have the space for it.
  • Free standing paper towel holders also look cute holding the spools of ribbon.
  • If you have a desk or bookcase that you are planning on using for the items, screw a dowel rod into it and put ribbon or even the wrapping paper on it. Just be sure that you rig it so you can slide the dowel rod out so you can change what you put on it.
  • There are also hanging organizers for closets that you can buy. And this one is really cool.
4. Put it all together. Put your like items together in the drawer or system that you chose. If you have a label maker, label the items for quick reference or for husbands (sorry guys). Then step back and marvel at how much more simple your life will now be.

Keep in mind that you can go as fancy as you want to. Want it to look like Martha Stewart did it herself? You can...but it will cost you time and money. This blog is dedicated to organizing with realistic solutions - which to me means keeping the spending down and using what you already have. That's what I did with my gift wrapping organizing.I used the storage I had already. Plastic stacking drawers. Do I love them? No. They aren't beautiful. They aren't clear. But they work and I don't need to buy anything else. And in this economy...that's saying a lot. I keep my gift bags and wrapping paper rolls in a laundry basket under my stairs. It's easy to get to and the basket keeps them all in one place. Here's what my ribbons looks like:

Friday, September 24, 2010

Organize Your Recipes

 
There are many options here. Here are some options with the pros and cons:
  • Recipe Box:
    • Pros: 
      • Can't think of any. Sorry people.
    • Cons: 
      • Waste of time! Who has the time to copy a recipe by hand onto an index card? 
      • Can get disorganized quickly. Print out a recipe from the computer? Don't have the time to write it on an index card? Guess what happens to it (and many more like it) - it gets shoved into the box. 
      • Doesn't stack well on top of each other. Which means that you end up wasting space. If you do have the wooden kind that stack, it is a pain to get the boxes on the bottom. 
  •  Photo Albums: 
    • Pros:
      • Good for those who do the box method and are fed up with it. Just put the same cards into a photo album book and you get many of pros of the notebook method.
    • Cons:
      • Expensive. Those photo albums will add up.
  • Notebooks:
    •  Pros:
      • Easy to put recipes you print or tear out of a magazine into it.
      • Easy to store. They fit in the cabinet just like a cookbook would.
      • Are kept in plastic sleeves, so food doesn't get on the paper. 
      • Easy to clean. When food does get on the plastic sleeves, just wipe off. 
      • Plenty of room for the pictures. I love a recipe that has a picture to go with it. This method gives plenty of room for that.
      • Can even fit index cards. Just glue them on a piece of white paper and slide the paper in the plastic sleeve. 
    • Cons:
      • Can be expensive. Notebooks are pretty cheap, but those plastic sleeves can add up. If you go this route, be sure to put recipes front and back.
  •  Online Resources:
    • Pros:
      • It's online. No paper. It's great for people who like everything to be online.
      • Most are free. Here's one option. Here's another
      • Wouldn't loose all your recipes in case of a fire. 
    • Cons:
      • Not for people who like paper. For the same reasons I will never get a Kindle, I will also never use an online recipe organizer.
      • May be difficult to actually use in the kitchen. You either print out the recipe or have your computer in the kitchen...not ideal.
      • Have to spend a large amount of time upfront typing out or scanning your recipes online.

    Once you choose your system, here are some tips to keep in mind:
    • Have a "to try" section. For example, if you do the notebook method, have one dedicated to recipes you haven't tried, but want to. All the others can the tried and true ones.
    • Label, label, label. Whatever your method, don't just stick the recipes in. Be sure they are organized by food type (seafood, side dishes, desserts, drinks, breakfast, breads, etc).
    • Go into as much or as little detail as you want. And do it in stages if you need to. I have a dessert and drink notebook. But, the recipes are just divided into desserts and drinks. Eventually I will add tabs and separate them into cakes, cookies, ice cream, etc. Have the grace to do what you can when you can do it. 

    Wednesday, September 22, 2010

    Functional Utensil Holders

     
    We all have them. Those circular things on our counters that hold our cooking utensils. Well, a year ago when we were redoing our kitchen counters, I started thinking about mine. How it didn’t hold all my utensils that I used on a regular basis. It was not efficient, which means it was not simplifying my life. So, I changed it. I bought a rectangular one instead of the classic circle. Here’s why:
    1. Go take a look at beside and behind your circular utensil holder. There’s probably quite a few crumbs and dust. A square or rectangle can be pushed against the back of the counter, therefore making less space for crumbs to hide…meaning less cleaning time for you.
    2. More space on the counter. Circles have wasted space. Squares and rectangles do not. My rectangular one created some much needed space.
    For full disclosure: I still have a utensil drawer. I keep items I rarely use in there. Like my potato masher, my second soup ladle, and my skimmer. Don't clutter up your utensil drawers with items you don't regularly use.

    Monday, September 20, 2010

    Do You Love Your Knife Storage?

     
    I hate knife blocks. I really hate them. I understand that they are functional. But, there’s just no beauty. And they take up real estate on counters. Sometimes precious real estate. So, here are some other options to store knives: 
    1. The drawer. If you have the drawer space, get a utensil divider/holder and store those knives in the drawer. I would recommend covers for your knives for this method. Or thisWe don't want anyone to loose fingers when they reach for a knife. 
    2. The metal strip. I LOVE mine. They are much prettier than the classic block. They are a magnetic strip that hangs on the wall, then the knives stay up via magnet.
    So, there you go. Another way to simplify your life by adding space and beauty to your kitchen.

    Thursday, September 16, 2010

    Organize Errands

     
    If you are anything like me, you do not enjoy errands. Did you know that even errands can be organized? And while that won't make you enjoy them, it will maximize your time and energy, which will make you hate them less.

    Tip 1: Chunk them. If you have multiple errands to do that are close to each other, run them all at the same time. Well, that would actually be physically impossible. But you know what I mean. You will save on gas by not having to go out again another day.

    Tip 2: Know your limits. Have kids with you? They (and you) can probably only handle 2-3 stores. Is it the end of the day and you're exhausted from work? Only plan on doing what you can handle. Said gas from Tip 1 may be worth spending to save your sanity.

    Tip3: Have a generally clean car. I know this sounds strange. But, if you are running multiple errands, you may accrue lots of bags. It can lead to stress and a shortening of your planned trips if you don't have enough space for all those bags.

    Tip 4: Shop online. This is make it such that you don't need to run as many errands. Which is a lovely idea.

    Tip 5: List well. Put all the items from Target under the heading "Target". Put all the office items you can't buy at Target under "Office Max". Put all the art supplies that you can't get at Office Max or Target under the heading "Hobby Lobby". And so on and so forth. Put the items you need under the store where you get them so you aren't spending precious time in the store trying to find all the Target items on your list.

    Tip 6: Keep your reusable bags in the car. And then use them.

    Tip 7: Bring a bottle of water and snack. This is key. Especially if you're going to the grocery store. We've all heard, "don't shop on an empty stomach". And it really is true. But not just for the grocery store.You may be tempted to stop at that Starbucks in Target. Or to just swing by Chick-fil-a before going to Home Depot.

    Tip 8: Create a centralize place at home to write down errands. I have a family notebook. It organizes my life (I see a future post in the making). One of the tabs  is "To Buy". Here is where I list out all my errands so all I need to do on errand day is to tear out that page. I'm not hunting for small pieces of paper all over the house.

     
    Caveat: Here I am about to talk about kids. For those who don't have kids - this section will benefit you as well since it deals with how to run errands well with kids. Because you know the drill: you're in a store watching a stressed out mother with her screaming child and think  to yourself, "Wow, I'm glad I don't have any kids."

    Most moms I know have preschool for their kids. Which in turn means that they have a chunk of time every week to get errands run. I have 3 children: a 5-year-old, a 3-year-old, and a 17-month-old. This is the first year that I have 3 hours every Thursday morning to run errands. A beautiful little thing called Mother's Morning Out. I say that to let you know that I am qualified to talk about running errands with kids. I've done it for 5 years in a row. Here's what I've learned:

    1. Start training them young. If the first errand they go on with you is when they are 3-years-old, expect them to act up. 
    2. Let me back up: train them. It doesn't come naturally to a child to behave when they are bored. Most have to be trained. Here's how I did it. I planned on taking several trips to the store when I didn't actually need anything. I wasn't rushed. I wasn't stressed. If the kid started yelling, I left and we talked about it. Before this method, there were many situations where I was in line or picking out something I really need. The kid started screaming. I couldn't leave, because I really needed the item. Nightmare. For everyone. Then I implemented this training system and it worked like a charm. 
    3. Feed them. Yes, I said it. If they are hungry or thirsty, chances are they will misbehave.
    4. Timing is everything. Please don't run to the store right before their nap time. Such a bad idea.
    5. Watch your stress level. Kids will pick up on it and feed off it. If you stay calm (especially when they are acting up), things will go much better in the long run. In the same vein: Don't care what people think about you or your child. Don't get embarrassed. We've all been there and most people are looking at your with compassion, not judgment.
    6. Bring an activity for them. For toddlers, stick them in the front of the cart, give them a small bag of Goldfish, and your golden. For preschoolers, bring a small pad of paper and crayon. For older kids, get them involved. Ask them to get the bag of carrots. Get their opinion on what cereal to buy. Unless of course it will start a battle. They want sugary one, you don't. In that case, don't even give them the choice. If you have a young reader, give them a list of items and they can go on a hunt for them.
    7. Be realistic. Young kids (and probably older, too) can't handle running to 7 different stores. While having high standards for them, keep in mind they are kids. However, kids really can handle going to 2-3 places while behaving in all of them. Keep your standards high. Expect them to behave, while knowing they may struggle.
    8. Bring a lovey for the younger kid. A cup of coffee for you (an adult version of a lovey).

    Monday, September 13, 2010

    Simplify Your Housework

    Ava's not sure she likes where this post is going...
    Simplify your housework. Don't do anything that someone else can do. Like any little people you happen to have living with you. Or perhaps your roommate. Even your dog (they are very good vacuum cleaners as far as food on the floor goes).

    Here's a starter list of when you can pass those chores onto the little people in your house, if you happen to have them. Incomplete of course. Add to it, print it out, and put it in a visible spot so you can not only simplify your life, but teach the kids some life skills as well.

    Keep in mind that these are when the child should be able to do the chore by themselves without much help. And here's my disclaimer: Don't have cleaning chemicals near kids.

    Toddlers/Preschoolers:
    • Put toys away
    • Pick out clothes for tomorrow
    • Get dressed 
    • Dust (put old socks on their hands)
    • Put clothes and bath towels in laundry basket
    • Wipe place at table after eating

    Kindergarteners: 
    • Empty trashcans
    • Make bed
    • Collect the mail
    • Fix breakfast cereal
    • Help put dishes away
    • Clear their spot after meals
    • Water plants
    • Clean windows 
    • Feed the pets
    • Fold and put away laundry (yes, they can learn to fold properly!)

    First/Second Graders:
    • Sweep floor
    • Clean bedroom
    • Sort books such that all the binds are facing out
    • Sort clean laundry
    • Set and clear table
    • Rake leaves 
    • Put away groceries 

    Third/Fourth Graders:
    • Vacuum
    • Clean the bathrooms
    • Load dishwasher
    • Take dog on a walk
    • Help make lunch or dinner

     Fifth Graders and Beyond:
    • Clean bathrooms
    • Clean kitchen
    • Do laundry
    • Iron clothes
    • Wash car
    • Mow lawn

    I'll leave you with some other REALLY cute pictures of Ava helping her daddy fix the refrigerator. Just because she's so stinkin' cute. But also as a reminder: LET THE LITTLE PEOPLE CLEAN!


    Wednesday, September 8, 2010

    Options for Storing Clothing

    It's almost fall!! My favorite season. Soup, jeans, sweaters, boots, pumpkin. Ahhhh. I'm feeling cozy just writing this.   So, before I go get a blanket and snuggle up with a cup of tea...


    System 1: Trash Bags

     Pros:
    1. Cheap. Enough said.
    2. Easy to transport/lend out. Just hand them the bag.

    Cons:
    1. Hard to store. The picture above is a client who had her kids' clothes in bags. The solution was to get them off the floor and put together in order of size.
    2. Hard to label. I love Sharpies, I do. But not to write on plastic trash bags.   

    System 2: Diaper Boxes
     

    Pros: 
    1. Cheap to free. If you can come across diaper boxes (either you have a baby, get them from friends who have had a baby, or ask for some on Freecycle).
    2. Holds quite a bit of clothing. 

    Cons:
    1. May not stack well. I had different brands, thus different size boxes...that may have been my problem.
    2. They wear out. After 3 kids, the boxes got a little worn out. Some tore.
    3. This is just me being picky. But, I like my labels to look nice and be easy to read. Not possible on a diaper box.

    System 3: Banker's Boxes


    Pros:
    1. Looks great (insert bias here since this is my system).
    2. Labels are easy to read and are uniform.
    3. They aren't big and bulky. Which makes them easy to get off the shelf without having to see a physical therapist.

    Cons:
    1. They don't hold a ton of clothes. So, this system is great for little people clothes, but not adults or teens.
    2. Costs money.
    3. Shouldn't be stored where they'd get damp. They are made out of cardboard.

    System 4: Plastic Bins


    Pros:
    1. Looks wonderful (minus the mom jeans).
    2. Labels are easy to read.
    3. Stacks beautifully.
    4. Holds a ton of clothes. This is really the best option for adult and teen clothing.
    5. If clear, you can see what's inside. 

    Cons:
    1. Can be costly.
    2. Can be heavy. Especially if you get the huge ones and stack them on top of each other.

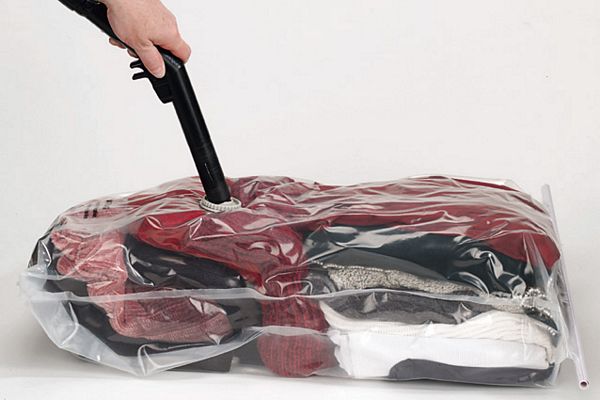
    System 5: Vacuum Sealed Bags


    Pros: 
    1. Saves space.
    2. It's clear, so you can see what's in it.

    Cons:
    1. Costs money.
    2. Hard to get in and out of. It'd be a hassle to add anything to the bag once it's vacuumed.
    3. Although it saves space, they may be hard to stack.


    Whatever Your System:
    • Label well.
    • Organize like season clothing in the same bins/bags/boxes.
    • Put a moth repellent in - especially if stored in garage, attic, or basement.
    • Be creative about space. I have this wonderful thing under my bed. I love it because it's clear, has wheels, and is hinged at the halfway point, so I don't have to slide the whole thing out to get something. So, think under beds, behind shoe racks, unused closets (yes, I live in dreamland), unused hope chest, shelves in the laundry room, and even unused luggage that you don't ever use. You get the picture. Be creative with storage. 
    • Don't hang sweaters and knits...distorts their shape. Always fold these.
    • Wash them all before you wear them. I once opened a box to find a spider crawling out. Would have hated to put that on my kids.
    • Purge as you unpack or pack. Chances are, if you didn't wear it this year, you won't wear it next year. Now's a great time to donate what you don't use. Remember: Simplify your life. Don't keep things you don't use...especially clothes. 

      Tuesday, September 7, 2010

      Where is That Darn Instruction Manual?!?!


      When your dishwasher breaks, the last thing you want to do is have to go hunting for its manual. Here are some ways to organize the pile of paperwork that comes with the gadgets we buy:

      1. The filing cabinet (or box) method:

      If you have an empty drawer to a filing cabinet (yes, I know I'm talking to the rare few), use it to store your gadget manuals and paperwork. Just get hanging file folders with tabs. Label them with what makes sense for you. I have a kitchen, computer, kids, outdoor/tools, home electronics, and household.

      You can also use this system with a filing box. I'd recommend a sturdy plastic one with a handle.


      2. The binder method:

      If you don't have a ton of manuals or you don't have the space for a filing cabinet, this may be a good way to go. Get a large 3-Ring binder, a packet of the plastic sleeve protectors, and dividers with tabs. Label your tabs with what makes the most sense for you. Add one manual per plastic sleeve. If you have a lot of manuals, you may want to get more than one binder.


      Additional thoughts:
      • Although I love alphabetical, I really do try to stay away from organizing that way. It's a pain to have to move all the folders around in the event that you add a new tab.
      • If you go the 3-Ring binder route - get one larger than you actually need, so when you add more, you'll have the space for them.
      • Keep rubber bands on hand as you're organizing. If something has multiple information, you can tie them all together before putting them in the folder or plastic sleeves. 
      • Plan on going through the files every so often to update them. I like to do this when I add a new manual. I will take the file folder out and purge any manuals that I no longer have the product for. 
      • Keep the extra hanging file folders and tabs in the same drawer or binder as your manuals. That way, you won't have to go on a hunt for them when you need to add an additional folder.
      • Do you really need the instructions to your hair dryer in Spanish, Chinese, and French? If not, toss those out and just keep the English. It will save a lot of space. 
      • Unless you have another system for receipts, you may want to store the product receipts with the manual. Staple them so they don't get lost.

      Sunday, September 5, 2010

      A post-vacation post

      Our 5th Annual Holden Beach trip with friends

      Some people do famous cities. Some do the mountains. Some do the beach. Others do the road trip across the country thing. My family spent the last week at Holden Beach. Hence, the no posts for this past week.

      And since I'm diving back into the real world, here comes my post-vacation post. About what? You guessed it: vacations.

      While my husband is in charge of the big picture things regarding our vacation (reserving the house and most importantly, loading up the van), I'm First-in-Command when in comes to packing. I learned a long time ago to make lists for what to bring. Here's what I've learned in the past few years:

      Keep that list in a word document, google document, or whatever other computer document that you use. That way, you don't have to rewrite the same list over and over again every year. And it can end up saving money. It's sad and frustrating to forget to bring sandwich bags to the beach and have to buy them there...especially if you have a million of them at home because you shop at Costco. Not that it's ever happened to me.

      My list has three columns and fits onto one page. Try to keep your list to one page. Saves on trees when you print it out and more importantly, saves your sanity because you don't end up losing one of the pages midpacking. My column headings are: General, Julie, Matt, Kids, and To Do Before Leaving. Remember to revise your list as soon as you get home while it's still fresh on your mind. I didn't have a chef knife on the list, but we all know how beach house knives are. So, on the list it goes. Now. And not the week before we leave for Holden Beach 2011.


      Are you one of the lucky ones who takes multiple vacations a year? Make a list for what to take when you go to the in-laws and make a separate one for when you go to the beach. And yet another one for when you go to Paris (threw that in for those who are falling asleep). Make as many of these documents as you need.

      And just because I love vacation pictures, I'm ending the post with some more.

      Morgan, age 5

      Ava, age 3
      Kennedy, age 16 months